
Introduction
Welcome to our ultimate guide on setting up Spring Boot! Whether you are a beginner or an experienced developer, these 5 easy steps will help you establish a solid foundation for your Spring Boot project. We’ll cover everything you need to know to ensure a seamless setup process.
Installing Java Development Kit (JDK)
In this initial step, we’ll guide you through installing the latest JDK version on your machine. The JDK is an essential requirement for running Spring Boot applications and developing Java-based projects.
Install JDK | Step by Step Installation of JDK with Prerequisites
Guide to Install of JDK. Here we discussed how to install JDK, its prerequisites and the steps regarding the…
5 Easy Steps for a Flawless Spring Boot Project Setup
Step 1: Setting Up an Integrated Development Environment (IDE)
A powerful IDE can greatly enhance your productivity when working with Spring Boot. In this step, we’ll introduce you Spring Tool Suite(STS) IDE and guide you through their installation. We’ll also demonstrate how to configure your IDE to work seamlessly with Spring Boot projects.
STS IDE Installation link — click here.
Step 2: Creating a New Spring Boot Project
Now that your development environment is ready, it’s time to create your first Spring Boot project. We’ll show you how to leverage tools like Spring Initializr to generate a basic project structure with just a few clicks. You’ll learn about essential project configurations and dependencies required to kickstart your development process.
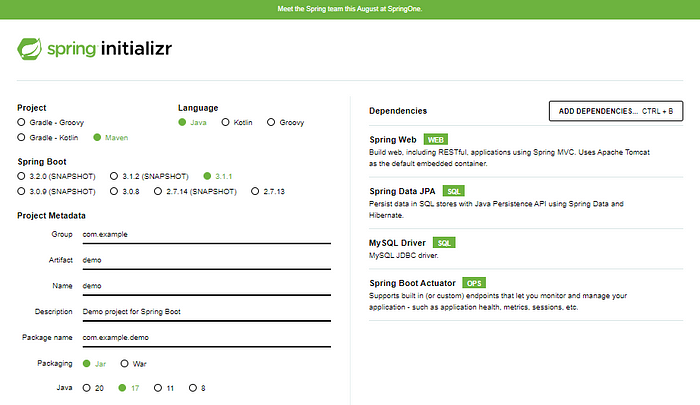
Spring Initializr is a powerful web-based tool used for quickly generating the initial structure and configuration of a Spring Boot application. It simplifies the process of setting up a Spring project by providing a user-friendly interface to select the desired dependencies, customize project settings, and generate a downloadable project skeleton.
Step 3: Understanding the Project Structure
A well-organized project structure is vital for long-term maintainability and collaboration. In this step, we’ll explore the various components and directories within a Spring Boot project. You’ll gain a clear understanding of how different files and folders are structured and their significance in the overall development process.

Our project structure look like this after successfully generated the demo zip folder through spring initializr.
We need to mainly focus on these three structure:
src/main/java — for Java files
src/main/resources — for property files and other configuration files.
pom.xml — for dependencies purpose. If anything needed for our projects.
Here are the steps to import our project in the STS tool.
- Click on the Browse button and then select the folder were your projects locate.

- Select the import button and then select Existing Maven projects under Maven section.

- Browse the project folder where you’ve already downloaded from Spring initializr and then click on the finish button.

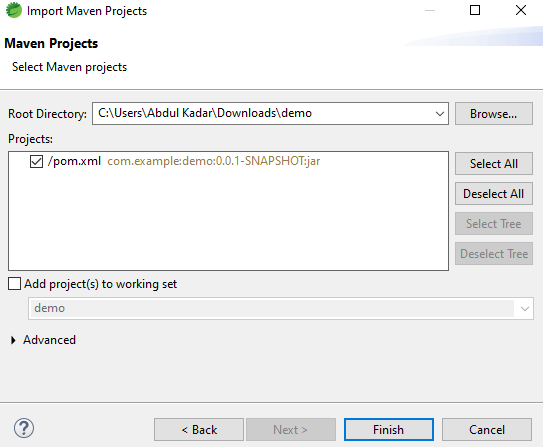
Now you are ready to start your development process !!!
Step 4: Implementing Basic Functionality
In this step, we’ll dive into the core of Spring Boot development by implementing basic functionality. You’ll learn how to create controllers, define routes, and handle HTTP requests. We’ll demonstrate various Spring Boot annotations and best practices to build robust and efficient APIs.
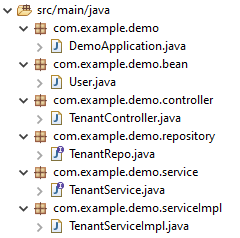
Don’t make a mistake for creating different package name for bean or model and controller and services and repository . We should follow the root package name com.example.demo and then add that name with subsequent package name.
Model
package com.example.demo.bean;
import jakarta.persistence.Column;
import jakarta.persistence.Entity;
import jakarta.persistence.GeneratedValue;
import jakarta.persistence.GenerationType;
import jakarta.persistence.Id;
import jakarta.persistence.Table;
import lombok.AllArgsConstructor;
import lombok.Getter;
import lombok.NoArgsConstructor;
import lombok.Setter;
@Getter
@Setter
@NoArgsConstructor
@AllArgsConstructor
@Entity
@Table(name = “users”)
public class User {
@Id
@GeneratedValue(strategy = GenerationType.IDENTITY)
private Long id;
@Column(nullable = false)
private String firstName;
@Column(nullable = false)
private String lastName;
@Column(nullable = false, unique = true)
private String email;
}
Controller
package com.example.demo.controller;
import java.util.List;
import org.springframework.beans.factory.annotation.Autowired;
import org.springframework.http.HttpStatus;
import org.springframework.http.ResponseEntity;
import org.springframework.web.bind.annotation.DeleteMapping;
import org.springframework.web.bind.annotation.GetMapping;
import org.springframework.web.bind.annotation.PathVariable;
import org.springframework.web.bind.annotation.PostMapping;
import org.springframework.web.bind.annotation.PutMapping;
import org.springframework.web.bind.annotation.RequestBody;
import org.springframework.web.bind.annotation.RequestMapping;
import org.springframework.web.bind.annotation.RestController;
import com.example.demo.bean.User;
import com.example.demo.service.TenantService;
@RestController
@RequestMapping(“/tenant”)
public class TenantController {
@Autowired
private TenantService userService;
// build create User REST API
@PostMapping(“/users”)
public ResponseEntity<User> createUser(@RequestBody User user){
User savedUser = userService.createUser(user);
return new ResponseEntity<>(savedUser, HttpStatus.CREATED);
}
// build get user by id REST API
// http://localhost:8080/api/users/1
@GetMapping(“/users/{id}”)
public ResponseEntity<User> getUserById(@PathVariable(“id”) Long userId){
User user = userService.getUserById(userId);
return new ResponseEntity<>(user, HttpStatus.OK);
}
// Build Get All Users REST API
// http://localhost:8080/api/users
@GetMapping(“/users”)
public ResponseEntity<List<User>> getAllUsers(){
List<User> users = userService.getAllUsers();
return new ResponseEntity<>(users, HttpStatus.OK);
}
// Build Update User REST API
@PutMapping(“/users/{id}”)
// http://localhost:8080/api/users/1
public ResponseEntity<User> updateUser(@PathVariable(“id”) Long userId,
@RequestBody User user){
user.setId(userId);
User updatedUser = userService.updateUser(user);
return new ResponseEntity<>(updatedUser, HttpStatus.OK);
}
// Build Delete User REST API
@DeleteMapping(“/users/{id}”)
public ResponseEntity<String> deleteUser(@PathVariable(“id”) Long userId){
userService.deleteUser(userId);
return new ResponseEntity<>(“User successfully deleted!”, HttpStatus.OK);
}
}
Service
package com.example.demo.service;
import java.util.List;
import com.example.demo.bean.User;
public interface TenantService {
User createUser(User user);
User getUserById(Long userId);
List<User> getAllUsers();
User updateUser(User user);
void deleteUser(Long userId);
}
Service Implementation
package com.example.demo.serviceImpl;
import java.util.List;
import java.util.Optional;
import org.springframework.stereotype.Service;
import com.example.demo.bean.User;
import com.example.demo.repository.TenantRepo;
import com.example.demo.service.TenantService;
@Service
public class TenantServiceImpl implements TenantService{
@Autowired
private TenantRepo tenantRepository;
@Override
public User createUser(User user) {
return tenantRepository.save(user);
}
@Override
public User getUserById(Long userId) {
Optional<User> optionalUser = tenantRepository.findById(userId);
return optionalUser.get();
}
@Override
public List<User> getAllUsers() {
return tenantRepository.findAll();
}
@Override
public User updateUser(User user) {
User existingUser = tenantRepository.findById(user.getId()).get();
existingUser.setFirstName(user.getFirstName());
existingUser.setLastName(user.getLastName());
existingUser.setEmail(user.getEmail());
User updatedUser = tenantRepository.save(existingUser);
return updatedUser;
}
@Override
public void deleteUser(Long userId) {
tenantRepository.deleteById(userId);
}
}
Repository
package com.example.demo.repository;
import org.springframework.data.jpa.repository.JpaRepository;
import com.example.demo.bean.User;
public interface TenantRepo extends JpaRepository<User, Long>{
}
Step 5: Working with Databases
Most applications require some form of data storage. In this step, we’ll explore different approaches to work with databases in Spring Boot. Whether you prefer relational databases like MySQL or NoSQL databases like MongoDB, we’ll guide you through the process of integrating databases into your Spring Boot application.spring.datasource.url=jdbc:mysql://localhost:3306/tenant-1
spring.datasource.username=root
spring.datasource.password=root
spring.jpa.properties.hibernate.dialect=org.hibernate.dialect.MySQLDialect
spring.jpa.hibernate.ddl-auto=create
server.servlet.context-path=/api
spring.datasources — for DB connectivity through the URL.
spring.jpa.properties.hibernate.dialect — for mysql driver initialization
spring.jpa.hibernate.ddl-auto— initially we should declare hibernate ddl as create, jpa will automatically creating the table in the DB. Once All the tables crated we should change the key as an update
server.servlet.context-path — context path of our application or root path to access our api — http://localhost:8080/api/tenant/users
To test our API we can use Postman Application


Check your database whether Records added in the User Table.
To install MySQL Workbench — Click here

Don’t miss out on valuable content — Follow my blog and stay ahead of the curve.

Frequently Asked Questions
Q: What are the prerequisites for setting up Spring Boot?
Before setting up Spring Boot, make sure you have Java Development Kit (JDK) installed on your machine. Additionally, a basic understanding of Java programming and web application development concepts will be beneficial.
Q: Can I use Spring Boot with different databases?
Absolutely! Spring Boot offers excellent support for various databases, including both relational and NoSQL options. You can seamlessly integrate popular databases like MySQL, PostgreSQL, MongoDB, and more into your Spring Boot application.
Q: Is Spring Boot suitable for large-scale enterprise applications?
Yes, Spring Boot is highly scalable and widely used for developing large-scale enterprise applications. Its modular architecture and extensive ecosystem make it an ideal choice for complex projects.
Q: How can I learn more about Spring Boot?
There are numerous online resources available to deepen your knowledge of Spring Boot. You can refer to official Spring Boot documentation, explore tutorial websites, or join online communities and forums dedicated to Spring Boot development.
Q: Is Spring Boot only suitable for web development?
While Spring Boot is commonly used for web development, it is not limited to that domain. Spring Boot can be utilized for developing various applications, including command-line tools, batch processing systems, and more.
Q: Can I use Spring Boot for microservices architecture?
Absolutely! Spring Boot provides excellent support for building microservices. Its lightweight and modular nature, combined with features like Spring Cloud, make it an ideal choice for developing microservices-based applications.
Conclusion :
In this comprehensive guide, we’ve explored the 5 easy steps to set up a flawless Spring Boot environment. From installing the JDK and setting up the IDE to creating the application, each step has been meticulously explained. We’ve covered essential topics like project structure, configuration ensuring you have a solid understanding of Spring Boot fundamentals. With this knowledge, you’re now ready to embark on your Spring Boot journey and build powerful and scalable applications.

Leave a comment